Showing posts with label Bread. Show all posts

Monday, September 12, 2011

My "Nine-Eleven" Bread

Okay, so I was going to make my normal White Bread from a previous post (click here) but I thought, since it was Sunday Sept. 11th (10th anniversary of the terrorist attacks on the USA) - I would make it Red White and Blue! So here ya go!


Recipe:
(makes 2 loaves)
5 3/4- 6 1/4 Cups all purpose flour
1 package of active dry yeast (or 1 Tbs of active yeast from the jar -- this is what I do)
2 1/4 Cups of Milk
2 Tbs Sugar
1 Tbs Butter
1 1/2 Tsp Salt
Red and Blue food coloring

1. In a large mixing bowl combine 2 1/2 Cups of flour and the active yeast; set aside.
In a medium sauce pan heat and stir milk, sugar, butter, and salt just until warm (120-130F) and butter almost melts. Add milk mixture to dry mixture and stir with wooden spoon (that's what I do) - or beat with electric mixer on high for 3 mins (scraping sides).
Now divide the dough among 3 bowls, evenly. In bowl 2 add red food coloring, in bowl 3 add blue food coloring to the dough. Now Add about a 1 cup of flour into each and stir. ((Add flour slowly, don't over do it and make a hard dough...not fun! Add more flour if 1 cup does not do it...)))


2. Turn dough out into a lightly floured surface and knead in the best you can to made a moderately stiff dough that is smooth and elastic (6-8 mins) Shape doughs into a ball and place in a lightly greased bowl - turning once to grease the surface of the dough. Cover; let rise in a warm place covered with a towel for about 1 hour, or until double in size. (45-60 mins).

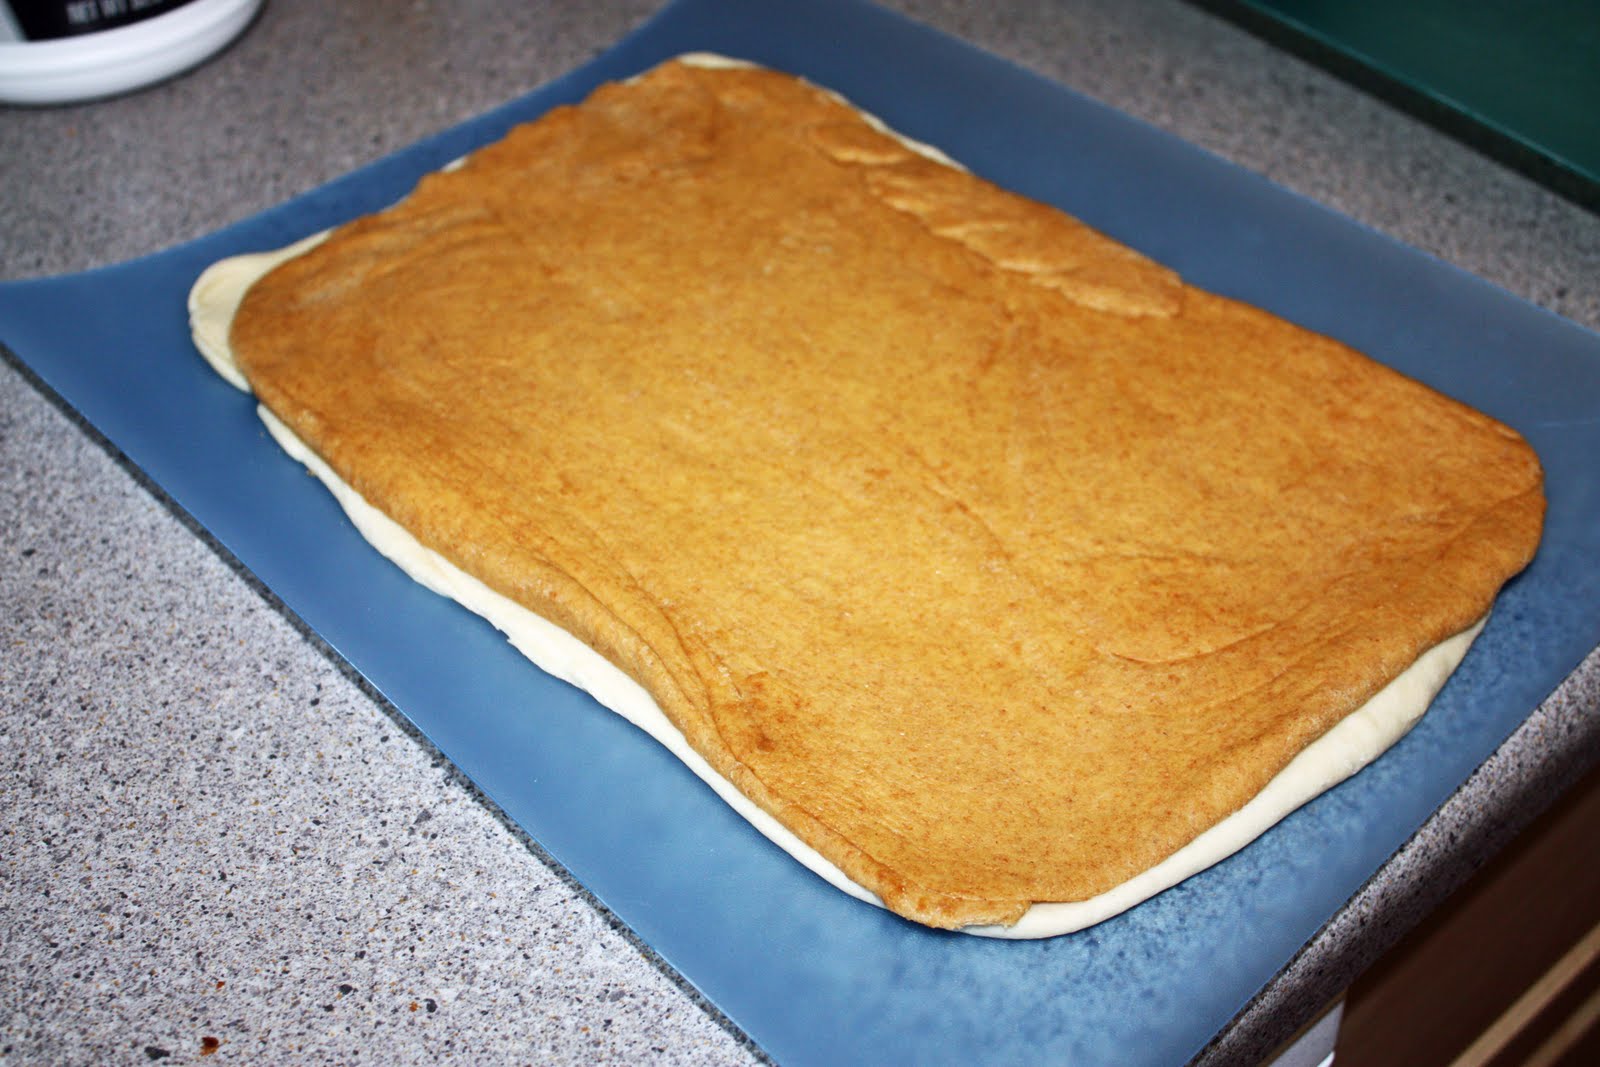
3. Punch doughs down turn dough out into a lightly floured surface. Roll each dough out like I did in my Marble Bread recipe (click here). Cover and let rest for about 10 mins. Meanwhile lightly grease 2 8x4x2" loaf pans.

4. Now place the red rolled out dough on top of the white dough, and then the blue dough over the red. Making a "sandwich" appearance. Start at one end and roll the doughs up into a log.


5. Cut the log in half and place in 2 greased loaf pans. Allow to rest and rise another 10 mins.


6. Bake at 375F for 30-40 mins, or until bread sounds hollow. (tap the top of the bread with your fingers). Watch the bread though!! Don't over cook.... -- if you find the top browning to quickly simply cover loosely with tin foil.

7. Remove from pans, and cool on wire rack.

I hope this was fun for you to make :) Now go grab from butter and honey! Yummmm

Potato Rolls

You think I have a bread addiction? You should see my husband when I make a batch of these moist rolls! The ever so popular and best loved *Potato Rolls!* I had never made nor had these before, but my husband started to rant happily about how delicious they are and that he grew up with them. I am not a big potato fan, but gave them a try for my dear Don's sake...

They were FANTASTIC! I have made them at least 4 times since... wonderful! moist! tasty! They were so good that Don (my husband) did not want to put anything on them, or even dip them in the roast I had made. Now that's saying something about these little guys!

Recipe:
4-4.5 Cups of all purpose flour
1 pkg active dry yeast (I use the jar, 1 Tbs)

1 Cup Milk

1/4 Cup Water

1/4 Cup Sugar
1/4 cup Shortening
1.5 tsp Salt

1 beaten egg
1/2 cup mashed potato


1. First off, get yourself a nice potato. Peel, and cut into quarters, and boil for about 25 mins. Afterward mash up and measure out and even 1/2 cup.

2. Combine 2 cups of flour and the yeast. Heat and stir milk, water, sugar, shortening and salt just until warm (120-130F) and shortening almost melts; add to flour mixture along with egg and mashed potato. Beat with an electric mixer on low speed for 30 seconds, scraping bowl. Beat on high speed for 3 mins. Stir in as much of the remaining flour as you can.

3. Knead in enough of the remaining flour to make a moderately stiff dough that is smooth and elastic. Shape dough into ball and place in a lightly greased bowl (turning to grease surfaces)-- cover and let rise until double in size. (about 1 hour).

4. Pre-heat oven to 375F and lined a cookie sheet with parchment paper. Punch down your dough and then tear portions off and roll into a ball. Place rolled balls on cookie sheet and allow to rest for 10 mins. (note: the first I made these I made fairly large balls and they were wonderful and moist -- the second time around I wanted to make a lot and made the balls smaller, they were still good - but not as moist...so go with large!) I made about 12 large rolls.

5. Place in oven and cook for approx. 11 mins.

6. Let the drooling begin! :) Enjoy~

Marble Bread

Okay it is no secret on my blog that I L-O-V-E bread - so naturally I have been experimenting with different breads and have only begun to slightly branch out. I have a couple foreign breads to try soon, so be on the look out!

This is the "Marbled Loaf" - which is kinda eye catching and impressive looking. It is made with a combination of white bread dough (divided in half) with molasses and whole wheat flour being added to the half. It is fun, and takes not much more time than a normal loaf of bread. Plus who can resist this delicious, warm snack? Whip out a cup of buter, mix a 1/4 cup of honey into it and go to town on this bad boy! Yummmmmm

Recipe:
3 to 3.5 Cups of all purpose flour
1 pkg active dry yeast (I use the jar, scoop 1 Tbs)
1.5 Cups Milk
2 Tbs Sugar
2Tbs Cooking Oil
1.5 tsp salt
2 Tbs Dark-flavored Molasses
1 and 1/4 Cup Whole Wheat flour (or you can try rye)

1. In a large maxing bowl combine 2 cups of the all purpose flour and the yeast. In a saucepan heat milk, sugar, oil and salt just to warm (120-130F). Add milk moxture of flour mixture. Beat with an electric mixer on low to medium speed for 30 seconds, scraping bowl constantly. beat on high speed for 3 mins.
(((((truth to be told, I NEVER do this. haha - I do everything by hand, stirring slow and vigorously for about 1 min. with an over sized fork)))))

2. Divide batter in half. (okay, so I made this probably harder than it needed to be, but I really wanted to measure half of the batter) So I poured everything into a glass measuring cup (large 4 cup type size) and then divided it up from there. I believe it always comes out of be 2 cups worth total. So to save you time, just dip out 1 cup of your batter into another bowl. No need for extra measuring....because I am just that nice, and did the work for you. :D

3. To 1 portion of batter, stir in as much of the remaining all purpose flour as you can. (**START SLOW!**) Knead in enough of the flour to make a moderately stiff dough that is smooth and elastic. Shape into a ball and place in a greased bowl, turning around to grease the surfaces. Cover and allow to rise in a warm dry place.

4. To other portion of batter stir in molasses, and wheat flour -- and then any extra white flour to make it a moderately stiff, smooth and elastic dough as well. Now do same as above, -- shape into a ball, put in a greased bowl and allow to rise. (1-1.5 hours to rise...go do something productive while you wait! :)

5. Punch both portions down, cover and let rest 10 mins. Meanwhile, lightly grease an 8x4x2 inch loaf pan; set aside.

6. On a lightly floured surface roll each dough portion into an approximate 12x8 inch rectangle. Place dark dough on top of light dough. Roll up and place seam side down into loaf pan. Cover and let rise until nearly double (30-40 mins....get back to being productive!)


7. Bake into a preheated 375F oven for 30-35 mins or until bread sounds hollow when lightly tapped. If you notice the bread getting too brown for your liking cover the top loosely with tin foil. When done immediately remove from pan and cool on a wire rack.

Fantastic Job Y'all! Now go mix your butter and honey and indulge!!! Yummmmy~

Sunday, September 11, 2011

Sweet n' Moist Corn bread

This recipe brings back a lot of memories, as it is one that I grew up with. Mom would ALWAYS make this when she made chili. It is not a grainy crumble corn bread, which I don't care for anyway - this is a melt in your mouth, give me another *please*, moist bread. Mmmmm Enjoy!

Recipe:
2 Cups of Bisquick
1/2 Cup Yellow Cornmeal
1 tsp Baking Powder
1/2 Cup Sugar
1 Stick (half cup) Butter

1 Cup Milk

2 Eggs

Pre-heat oven to 350F.

1) Blend All the above ingredients together and pour into a 8x8 dish.

2) Lick Spoon. (I think the batter tastes YUMMY...mmmmm) ;-P

3) Cook for about 30-35min. Take Cornbread out of oven and stick a toothpick or knife in the center, if it pulls out gooey cook for an additional 3-5 mins -- if it comes out clean pat yourself on the back, because you are awesome!

4) Serve warm plain, or with butter and or honey. Enjoy!


(I Made This Bread to go with the above post "Chili Pasta Skillet" )


Saturday, August 6, 2011

Breadsticks

This recipe is so tasty next to a large plate of spaghetti or stuffed peppers guts. YUM! It is a quick bread, so no hour+ waiting for dough to rise - just about 5 minuets to make sure the yeast activates. Super Simple, Super Delicious!


Recipe:
1 Tbs Dry yeast (or 1 package of dry yeast)
1 Cup warm water (~110F)
1 Tbs Sugar
3.5 Cups of Flour (give or take a little...start off with 3, then add)
2 Tbs Olive Oil
1 tsp Salt

Put 1 cup of water into a tall dish or bowl, add the sugar and yeast. Stir around gently and then let rest. Your yeast (if good) should activate. You can tell because a nice foam will grow on top of the water. If this does not happen, try again. Yeast will not activate if water is too cold, and will die if water is too hot. (and sometimes, you just get a bad batch of yeast, might be old). When this is done add the yeast mixture to your flour and combine with the salt and olive oil. Mix around the best you can with a large fork or wooden spoon. Now flour your hands up and knead the dough until it is smooth, round and soft.

Place a sheet of parchment paper over a flat cookie sheet and place your dough ball into the center. Roll the dough out into a big "pizza" circle. (I often tear another sheet of parchment paper off and place it on top of my dough, then use a rolling pin to flatten - it saves it from sticking to my rolling pin, and saves me from having to wash another dirty utensil. -- sprinkle the dough with some flour before though!)

Now you can either move right along with the yummy breadstick making process, or leave dough to relax for about 10 mins. This will allow it to settle and grow some in height. Now what you want on your bread stick is up to you. My normal process is this:

1. Spread thin layer of butter over the top (raw dough, still....have not baked it yet!)
2. Sprinkle Garlic salt and powder over the top, then if handy, sprinkle garlic bread seasoning over the top as well.
3. Sprinkle Parmesan cheese powder
4. Sprinkle finely shredded Parmesan cheese
5. Sprinkle finely shredded Colby and Monteray Jack cheese
6. Crush and sprinkle parsley leaves over the top.
(note: I forgot the parsley in my picture...sorry - the green gives it a nice finished look)
-- I often spread "Italian Seasoning" mixture over as well. Just don't overdo the flavors, moderation people! Moderation...


Okay now that you have this fine looking raw circle in front of you - shove it into the over! 350F for about 17 mins. Just watch for done-ness. The bread should rise and fluff up, and the cheese crust a little on the edges.

I hear the timer going off! Take it out!

Allow to cool.
Then using a knife, or preferably, a pizza cutter - slice the bread into long/short strips. and ..YAY! You're finished...and I bet it looks great. Enjoy~

Friday, June 10, 2011

Challah Bread! Mmmmm

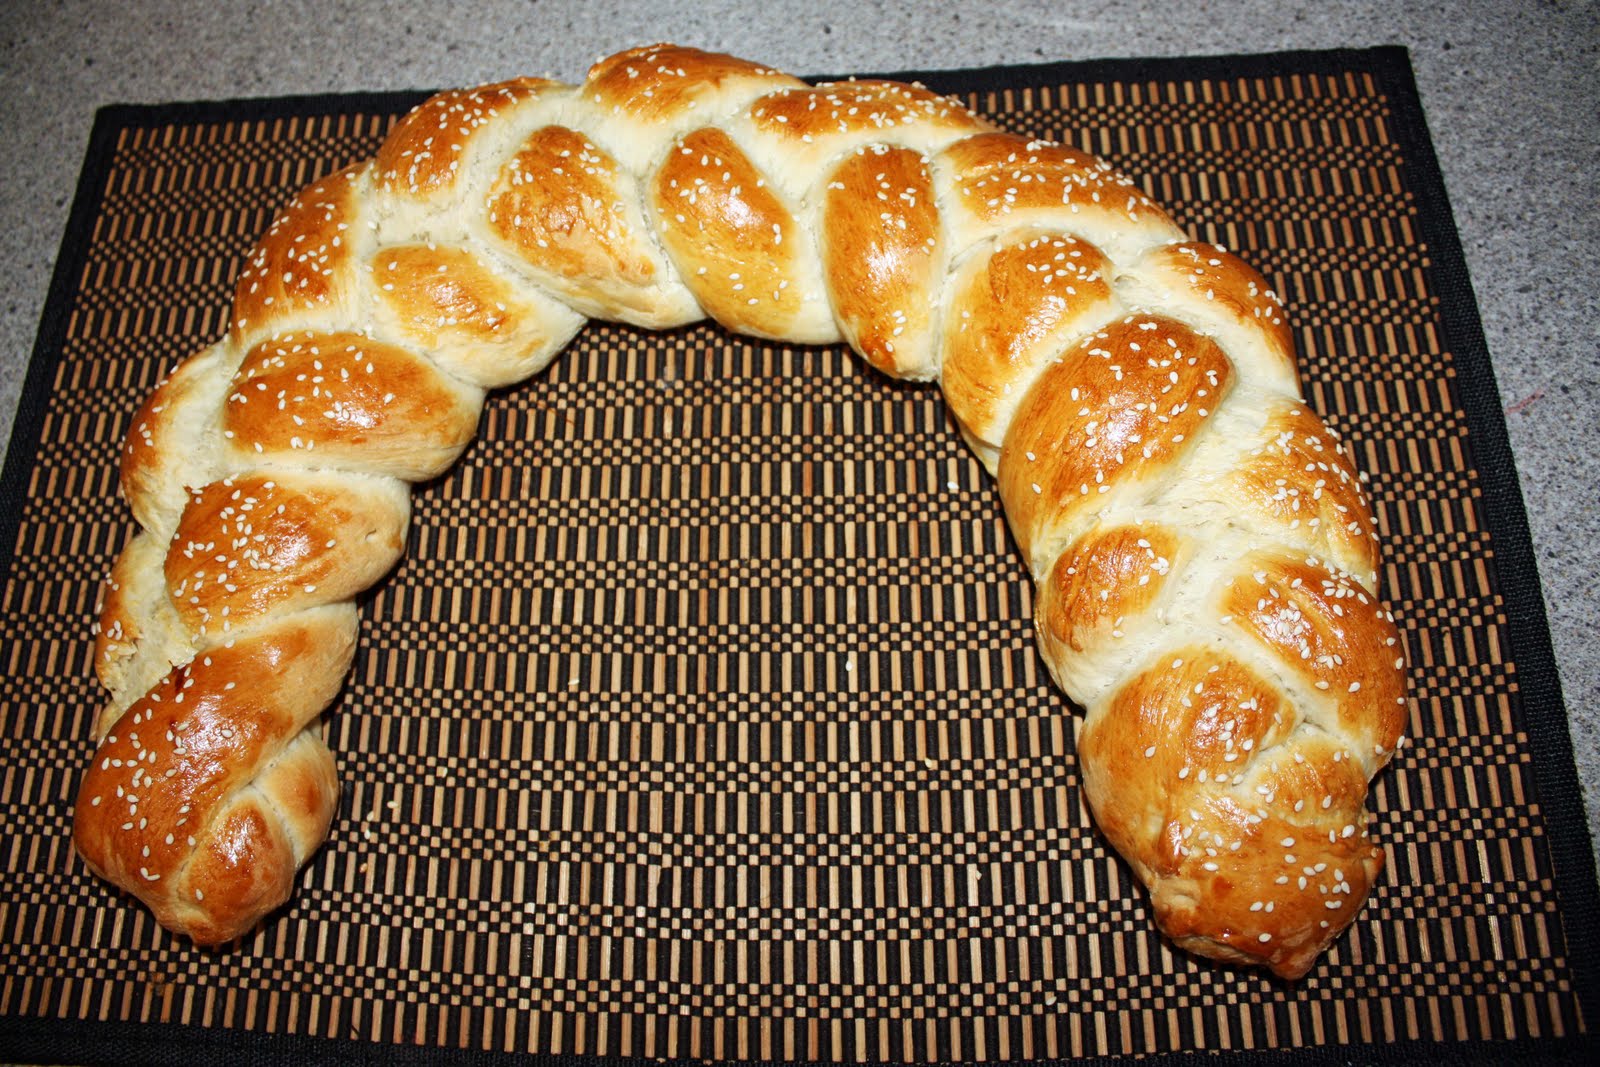
This is a fancy-dancy looking bread you can make when guests come over for dinner.....or on a Wednesday night while your husband is in a late study group meeting. It is again, like most of my recipes on here, simple to make - and does not require hours like some yeast breads. I wanted to impress my husband with it's cool braided design and it did the trick. He thought it looked all store bakery - I smiled :) This is the original "Egg Bread", but with 2 modifications, making it a "Challah"...which supposedly is a Jewish origin bread, traditionally made during holidays. Even though it looks like a lot of hard crust it is in fact very soft and moist. The brushing of egg yolk before baking gives it that nice golden look. It was especially yummy with butter, honey or Honey-Butter mixture. Mmmmmm Enjoy~


Recipe:
4 3/4 to 5 1/4 Cup All Purpose Flour
1 package of active dry yeast (or 1 Tbs yeast from jar)
1 1/4 cups Water
3 Tbs Sugar
3 Tbs of Margarine
1/2 tsp salt
2 Eggs

1. In a large mixing bowl stir together 2 cups of flour and the yeast; set aside. In a medium saucepan heat and stir water, sugar, margarine and salt until just warm (margarine starts to melt). Add water mixture to flour mixture along with eggs. Beat with electric mixer on low to medium speed for 30 seconds (or stir with fork/wooden spoon till all ingredients combined). Now add in as much of the remaining flour as possible. Don't over do it though! I believe I only used a little over 4 cups.

2. Knead enough of the remaining flour to make a moderately stiff dough that is smooth and elastic ( 6-8 mins) Shape dough into a ball and place in a lightly greased bowl, turning once to grease all sides. Cover; let rise in a warm place until double in size ( about 1 hour).

3. Punch dough down. Divide dough into thirds. Cover; let rest 10 mins. Roll each third into an 18-inch of so long rope. Place ropes on a greased large baking sheet, 1 inch apart; braid ropes. (now, I did not have a "large" baking sheet, so I braided my ropes on the counter and transferred it to my parchment paper, making a rainbow shape to fit on the sheet. ) cover, let rise in a warm place until nearly double (about 30 mins) ----brush braid with 1 beaten egg yolk (*gasp* I don't have a brush!....just use your hand! I would grab some yolk and just smear it across my bread....wash your hands before and after though! gross! :) ---sprinkle bread with sesame seeds and/or poppy seed.

(I had "rope" that was longer than the others...I cut it into 3 more little ropes and made a small braided bread-stick...hehe waste not want not!)

4. Bake at 375F for 25-30 mins -- or until bread sounds hollow when you tap the top...cover with tin foil if it is not done cooking and you don't want the bread to get to brown. My only took 22 mins to bake. Enjoy your awesome looking masterpiece!

(after baking)
Yumminess!

Tuesday, May 31, 2011

Strawberry Shortcakes and homemade Whipped Cream

Mmmm you know summer is here when you start craving strawberry shortcakes! We go through a lot of strawberries in our house and this one particular day I felt like making some yummy shortcake. I flipped open my Better Homes and Garden cook book and found just the thing. It was delicious! The cake was fluffy and sweet - perfect when served warm with a nice scoop of sliced strawberries and whipped cream on top....Mmmmm I want one right now!
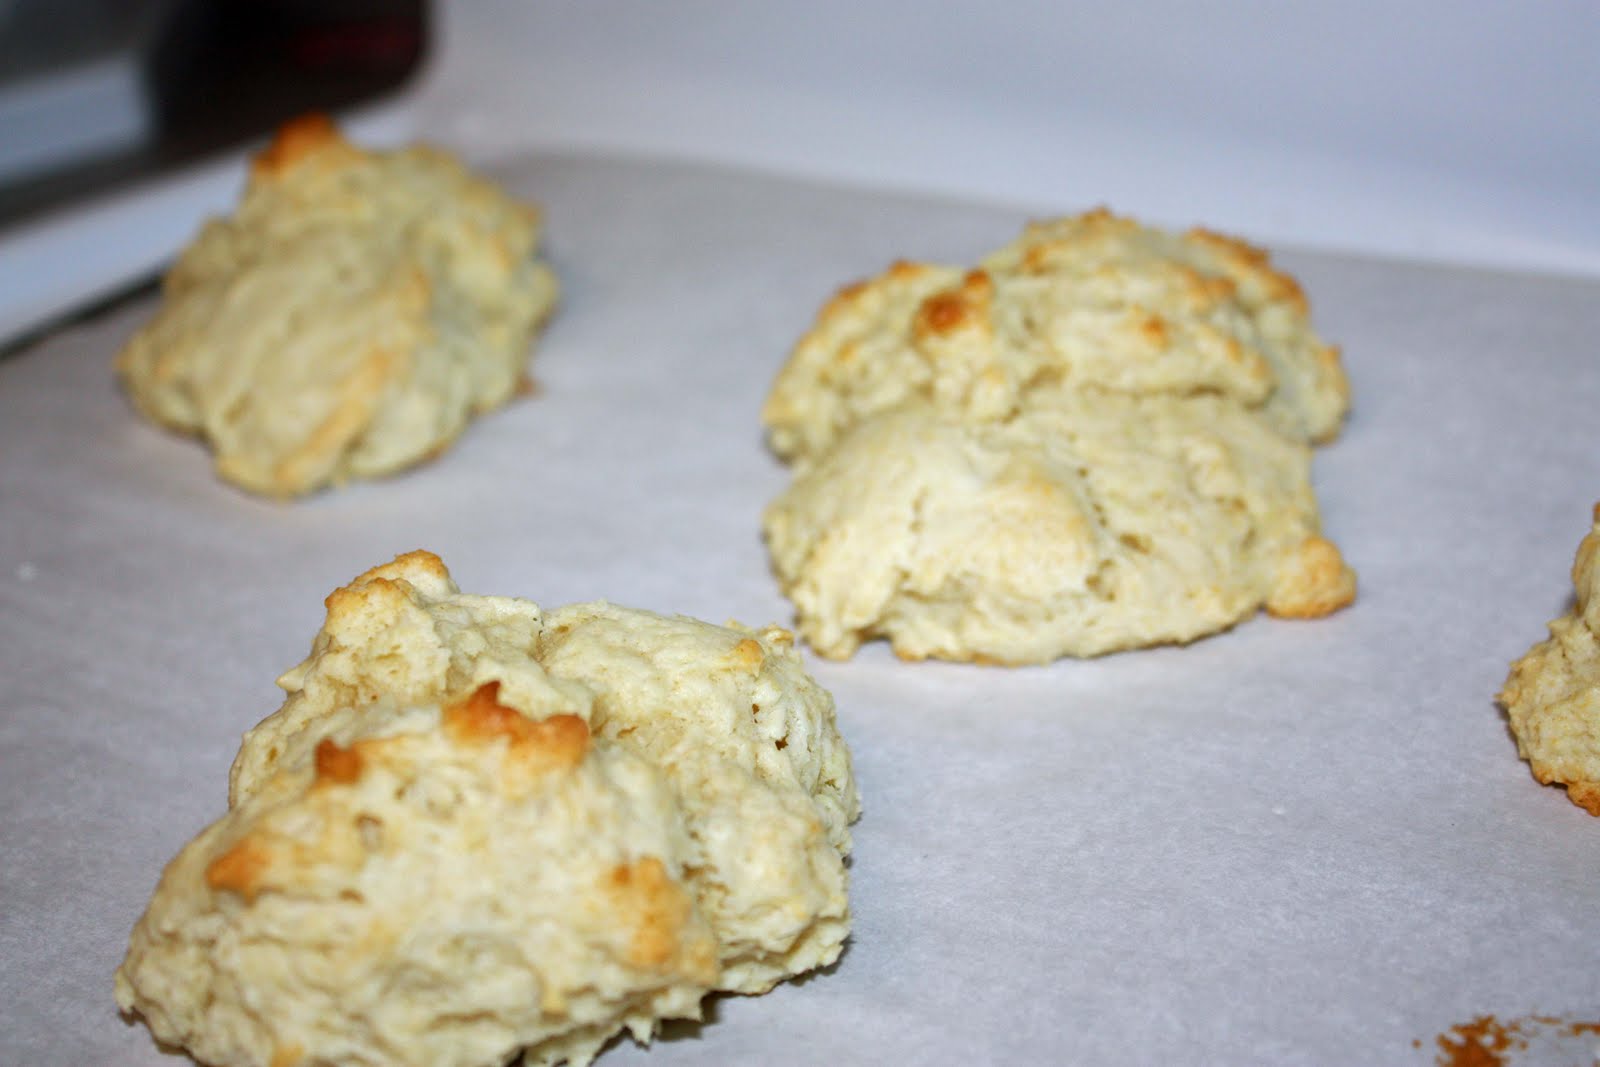
It was a simple recipe and you just plopped the batter onto a cookie sheet and baked. Of course they won't look like your processed little shortcakes you buy in the packets at Wal-Mart...these are much better!

Recipe:
1.5 Cups all purpose Flour
1/4 cup Sugar
1 tsp Baking Powder
1/4 tsp Baking Soda
1/4 tsp Salt
1/3 cup cold Butter
1 Egg
1/2 cup Dairy sour cream
2 Tbs Milk

1. Preheat the oven to 400F. Lightly grease a baking sheet (or use parchment paper!); set aside. In a medium bowl combine flour, sugar, baking powder, baking soda, and salt. Using a pastry blender, cut in butter until mixture resembles coarse crumbs. In a small bowl combine egg, sour cream, and milk. Add flour mixture, stirring with a fork until moistened.

2. drop dough into eight mounds onto baking sheet. Bake for 12 to 15 mins or until golden (dont over cook! Start low, like 11 mins... keep watch) --- Transfer to wire rack, let cool.

Serve with strawberries and Whipped Cream. ....Now, you can use the store bought whipped cream, or...make your own!! It's fast and easy - and tastes great!

Recipe for Whipped Cream:
In a chilled mixing bowl add 1 cup of whipping cream, 2 Tbs sugar, and 1/2 tsp vanilla. Beat with an electric mixer on medium speed until soft peaks form (or, for about 10 mins by hand with a whisk) That's it. Now go and enjoy! YUM!.... sit outside and eat...it makes it all that much more pleasurable.


Nun's Puffs

So you're probably thinking, what in the world in a *Nun's Puffs* haha...I was too! I was making dinner one night (see below post, Swiss Steak) and wanted to make a bread - but knew I did not have time to make a yeast bread and do the whole process of rising, etc, etc... so I searched through one of my cook books for a bread recipe that was quick. I saw these and thought, hmmm that looks interesting! I am glad it included a picture (which normally sell me to make the recipes in the first place, it's hard to make something when you don't know what it is supposed to look like afterward!) The prep time listed was about 25 mins, and the bake around 30. Sounds good to me! Better than a few hours! So that is where my Nun's Puff adventure started...and since I am posting all these extremely late I have since made this recipe about 6 or 7 more times! Yes, it is that good. They remind me of a puffy crepe, or kind of a German Pancake type taste. You make it on the stove, has very few ingredients, and you cook them in a muffin tray! Served hot with honey...or strawberries and whip cream. My husband can't get enough of them! I honestly think they are good, but I can only eat about 1. Just not my thing.

Recipe:
1/2 Cup butter
1 Cup Milk
3/4 cup all-purpose Flour
4 eggs
1 Tbs Sugar
Honey (optional - but recommended!)

1. Preheat oven to 375F. Generously grease twelve muffin cups, including the edge and around the top of each cup; set aside. In a medium saucepan melt butter; add milk. Bring to boiling. Add flour all at once, stirring vigorously. Cook and stir until mixture forms a ball that doe snot separate, Remove from heat; cool for 5 mins. (I actually take the pan off the heat and add the flour and stir until it forms a ball)\

2. Add eggs, one at a time, beating for 1 min with a wooden spoon after each addition or until smooth. Divide dough evenly among the muffin cups. --filling the cups about 2/3 full. Sprinkle with sugar ((which we have never done, but I am sure tastes great! - trying to reduce sugar for us)

3. Bake about 30 mins or until golden brown and puffy. remove from pan. Serve immediately - serve with honey!! ...also, I never went the full 30 mins. Normally 23-25 mins is good.
Enjoy!


Previous post had the Swiss Steaks I made with the Nun's Puffs. :)

Thursday, April 21, 2011

Homemade Soft Pretzels

These were actually really good! When Don and I first got married we would go to Sam's Club every so often, and to treat myself to the "bulk shopping" adventure I would get a huge soft warm pretzel from the food court. Mmmmm I love big chewy pretzels! Sadly, these are not as good as Sam's Club...but hey, what can ya do? :)

Recipe:
1 1/2 cups warm (110 to 115 degrees F) water
1 tablespoon sugar
2 teaspoons salt
1 package active dry yeast
22 ounces all-purpose flour, approximately 4 1/2 cups
2 ounces unsalted butter, melted
Vegetable oil, for pan
10 cups water
2/3 cup baking soda
1 large egg yolk beaten with 1 tablespoon water
Pretzel salt

Combine the water, sugar and salt in the bowl of a stand mixer and sprinkle the yeast on top. Allow to sit for 5 minutes or until the mixture begins to foam. Add the flour and butter and, using the dough hook attachment, mix on low speed until well combined. Change to medium speed and knead until the dough is smooth and pulls away from the side of the bowl, approximately 4 to 5 minutes. Remove the dough from the bowl, clean the bowl and then oil it well with vegetable oil. Return the dough to the bowl, cover with plastic wrap and sit in a warm place for approximately 50 to 55 minutes or until the dough has doubled in size.

Preheat the oven to 450 degrees F. Line 2 half-sheet pans with parchment paper and lightly brush with the vegetable oil. Set aside.

Bring the 10 cups of water and the baking soda to a rolling boil in an 8-quart saucepan or roasting pan.

In the meantime, turn the dough out onto a slightly oiled work surface and divide into 8 equal pieces. Roll out each piece of dough into a 24-inch rope. Make a U-shape with the rope, holding the ends of the rope, cross them over each other and press onto the bottom of the U in order to form the shape of a pretzel. Place onto the parchment-lined half sheet pan.

Place the pretzels into the boiling water, 1 by 1, for 30 seconds. Remove them from the water using a large flat spatula. Return to the half sheet pan, brush the top of each pretzel with the beaten egg yolk and water mixture and sprinkle with the pretzel salt. Bake until dark golden brown in color, approximately 12 to 14 minutes. Transfer to a cooling rack for at least 5 minutes before serving.

Monday, March 28, 2011

Whole Wheat Bread ...mmmmm!

More bread!? Yes, yes indeed. I already admitted I have a problem, now just get on the wagon with me already! You know you like bread too...and you'll love this wheat bread! Especially when its fresh and hot out of the oven; with honey dripping off the sides. DROOL.....

Recipe:
3- 3.5 Cups White Flour
1 package of dry active yeast (I use the jar yeast, and add 1 Tbs)
1 3/4 Cups of water
1/3 Cup packed brown sugar
3 Tbs butter (margarine or shortening)
1 1/4 tsp Salt
2 Cups of whole wheat flour

1. In a large mixing bowl combine 2 cups of white flour and the yeast, stir and set aside.
In a medium sauce pan heat and stir the water, brown sugar, butter and salt just until warm and the butter starts to melt. Now add this mixture to the flour mixture and stir well (either with an electric mixer or a wooden spoon) Add the 2 cups of whole wheat flour and when that is mixed, add as much of the remain white flour as you can. Careful, don't go overboard! You don't want dry cracking dough.

(p.s. CONFESSION! I was trying to occupy Carter at the same time as making this recipe and did not pay attention to the 2 cups of WHITE flour in the beginning, but added 2 cups of wheat flour and yeast instead. It all turned out fine in the end, and I feel it did not make a difference. I just added 2 cups of white after mixing everything together, then extra white flour as needed. No worries :D)

2. Turn dough out onto a lightly floured surface and knead till moderately stiff/smooth and elastic. Place in a greased (I use PAM spray) bowl and allow to rise for about an hour or so. Till double in size.

3. Punch dough down, and divide into 2 portions for 2 bread pan loaves. Allow to rest and rise for another 10 mins. ( or you can cover and let rise for another 30-45 mins... bread will be a lot fluffier!)

4. Preheat oven to 375F and bake for about 35 mins. Mine never take that long, make sure to check every 10 mins. You want them golden brown and split/pulled open at the top.

5. Dump out of bread pans and place on a cooling rack. Serve warm...and with honey. Mmmmmm Enjoy!

Homemade Dinner Rolls (buttermilk!)

Mmmmm BREAD! Curse you Italian lineage! I am a sucker when it comes to bread, and if I had my choice could live off of that and cheese alone. Mmmmm. Well these rolls were awesome! Don I think liked them more than I (which is weird)! After the dough process was complete I made a few different types to throw in the oven. Some I rolled in a ball, others I flattened out and made pretzel/knot tying shapes and even crescent ones. All tasted the same, but allowed Carter and Don to grab what they preferred, aesthetically speaking that is. :) P.s. I made the Buttermilk version. I will list the variation below.

Recipe:
4 1/2 to 5 Cups of white flour
1 package active dry yeast (I use a jar of yeast and put 1 Tbs in)
1 Cup Milk (see**)
1/3 Cup Sugar
1/3 Cup butter/margarine/or shortening
1 tsp Salt
2 Eggs(see **)
(** For Buttermilk use 1 and 1/4 Cups of buttermilk for the milk and only 1 egg**)

1. In a large ixing bowl stir together 2 cups of the flour and the yeast. In a small saucepan heat and stir milk, sugar, butter and salt just until warm (120-130F if you're using a thermometer). You want the butter to almost melt, but not too hot or you'll kill the yeast when you add to the flour. Now after it is starting to melt add to the flour mixture then add the eggs. Mix well together with an electric mixer or wooden spoon (I actually use a flat large fork). After this is all combined, slowly add as much of the remaining flour as you can. Don't over do it though!

2. Now knead the dough until it is smooth and elastic. Shape dough into a ball and put in a greased bowl (greased with cooking spray or shortening - I just spray with PAM). Place in a warm spot and cover with a towel. let it rise until the dough is doubled. -- about an hour or so.

3. Now punch the dough down and turn onto a lightly floured surface. Tear and shape into balls, or roll out and cut and shape into whatever you are trying to achieve. Like if you are wanting to try a knot type, roll the dough out into a long "snake" (like when we all played with play-do back in the day) then simply take the two ends and loosely tie a knot. Simple!

4. Now you can either shape and make everything you want and let rise for another half hour till large and fluffy, or you can let stand for 10 mins then through them into the oven. Which is what I normally do.

5. Oven should be pre-heated at 375F. Stick those yummy looking guys into that oven and set the timer for 12-15 mins. check after 10 mins to make sure they are not getting too golden/brown. Your oven might cook hotter than the average!

6. Serve warm with melted butter over the top, or place on wire racks to cool. Mmmmmm!

Don brought these to school the next day to eat and give to others because I did not want them in the house. I knew if I could see them during the day I would eat them all.
Hi my name is Ashley, and I am a bread-aholic.

Wednesday, March 9, 2011

Cinnamon Pear Muffins

Sorry I am behind on some of my posts. I have always enjoyed making these since I discovered the recipe from the P90X nutrition book. I have modified it a bit for the ingredients I had in my house that day and have kept it the same ever since. They are delicious for a morning snack and freeze well for later enjoyment.


Recipe:
Oven @ 350F
Whisk together:
3/4 Cup canned pear juice
2 Egg Whites
2 Tbs Vegetable Oil
1 Tbs Lemon Juice
Then Stir In:
2 Cups All Purpose Flour
2/3 Cup Brown Sugar, packed
1 tsp Baking Powder
1 Tbs Cinnamon
1/2 tsp Salt
1 Can of pears (the pears inside the can you used the pear juice from! silly...)Be sure to cut up into pieces the pears!
((Optional:: 1/2 Cup low fat granola, or 1/2 Cup Oatmeal))

Now the batter should be lumpy...and yummy to the taste. Not that I ever eat the raw batter, ha! that's just unheard of....uh....ummm, yeah....

Dish out into your muffin tray (which you already sprayed heavily with Pam or use a muffin paper cup)

Toss in the oven for about 16-20 mins (watch, don't burn them! Your oven might cook very hot) and enjoy them nice and warm! Scrumptious!! :)

Friday, February 25, 2011

"Macaroni Grill" BREAD! wow, wow and WOW

So have any of you been to the Macaroni Grill restaurant before? If you have then you are well aware of their delicious bread they serve with olive oil before your meal comes out. This is a warm, soft (yet crunchy) bread that makes your taste buds dance and your endorphins released. (yes, you really do feel happy with this bread! hehe) The recipe is very easy and makes two medium sized loaves. Let's get started before I drool too much....

RECIPE:
1 Tbs of Dry active Yeast
1 Tbs Sugar
1 Cup Warm water (105-115F)
2.5 Cups of Flour
1 tsp Salt
2 Tbs Rosemary (I actually used about 4tbs)
1 Tbs Olive Oil
2 Tbs Butter or Margarine
Salt/Sea Salt

Turn the oven on to 200F (not for baking, just letting it warm)
Blend the yeast, water and sugar together and let sit for a few mins.

In a mixing bowl place 2 cups of the flour, salt and rosemary. Now add your yeast mixture and blend well. Slowly add the last half of flour to the mixture and knead into a soft and stretchy dough.

In another bowl pour in some olive oil and then place your dough ball in their - turning around to coat both sides. Now turn your oven off and place the bowl with dough in the oven covered with a towel. Let rise for about an hour, or until double in size.

After the dough has risen take it out of the bowl onto a cutting board and divide the dough into 2 equal parts. Don't worry, the dough will be pretty soggy from all the olive oil it sat in. No worries. Place some flour on your hands and punch/knead down again. Now shape the 2 little dough balls into a "loaf" and place next to each other on a cookie sheet/baking pan. Place back into the *off* oven to let rise for another 20-40 mins.
Take the dough out of the oven and turn it on to 450F. After the temperature has been reached stick your dough back in the oven for about 20-25 mins. My oven runs hot and by 20 mins they were pretty brown on top. The dough was not burnt, but I would like it a little less brown; so next time I am going to go for 18 or so mins. :) Just watch your bread!!

When down, *lightly browned and hollow sounding* transfer to a cooling rack and then dig in! I poured some olive oil into a bowl and adding Italian seasoning and some salt to it. YUM YUM YUM!
Big hit with my husband, mother and son!
Enjoy~

Sunday, February 20, 2011

Thai Chicken Pizza

So I was in a Pizza mood but didn't want to order out or buy one.....even though I LOVE DiGiornos "Stuffed Crust" pizzas! (*drool*) I really have a problem with cheese and bread. Yikes! Anyway...wanting to venture out into the unknown I decided upon an interesting piece; a Thai flavored pizza! First reactions anyone? Well let me sum it up as an:
"Acquired YUM"
At first when I bit into it I was like...uh, hmmm (seriously, that's what I said). And then dished out some onto a plate, wrapped it and brought it to Don who was still studying on campus.

Me:"Here ya go Honey! *kiss*"
Don: "Mmmmm Pizza!"

Me: "Uhmmm, yeah. Though, honey, it tastes a little different. I experimented in the Thai genre, so be open minded with the flavors...oh, and the crust is homemade too and I probably should have cooked it longer."

Don: "Okay, well I am sure it is good. Thanks Ash. OHHHH is that a chocolate bar!!??"

(A.D.D.? ...ha, nope. I always include a treat...and who would'nt react to a c.bar? seriously...)

And there ya have it folks. A glimpse into my life. Now, onto the recipe. Perhaps the above did not sound like a 5 star rating for this dish but it was actually very good. It was different, and at first I did not care for it -probably because I am not use to ginger and peanut butter on my pizza- but it mixed well and brought a new yummy spin on a normally boring pizza. So I do recommend it to try! We did eat all the leftovers....so, that does say something!
RECIPES:

Pizza Crust-
(oven on at 400F)
  • 2.5-3 Cups of Flour
  • 1 package of Active Dry Yeast (I always use 1 Tbs of dry yeast from the jar)
  • 1/2 tsp Salt
  • 1 C warm water (120-130F)
  • 2 Tbs of Olive Oil
In a large bowl combine 1 and 1/4 Cup Flour with all the above ingredients. Mix well with an electric mixer or wooden spoon. (I normally use an over-sized mixing fork). Now add in as much of the remaining flour as possible (don't make it too dry though!)
Knead dough into a smooth and elastic ball and place in a greased bowl, covered, for about 10-15 mins. After the dough has risen punch down and roll out on a flat cooking sheet to a round circle. (remember to use your parchment paper from a previous entry!! Saves cleaning and dough sticking).
Stick that good looking homemade pizza crust in the oven for about 10-15 mins. Just until the crust starts to golden.

Thai Chicken Sauce:
I took about 2 chicken breasts (boneless/skinless of course), cooked thoroughly and then shredded.
  • 1/4 cup(s) smooth natural peanut butter
  • 3 tablespoon(s) water
  • 2 teaspoon(s) soy sauce
  • 2 teaspoon(s) rice vinegar
  • 2 teaspoon(s) minced fresh ginger
  • 1 clove(s) garlic, minced
  • 1 teaspoon(s) canola oil
  • 1 green pepper
  • 4 scallions, thinly sliced (I excluded these - forgot to buy- whoops!)
  • shredded cheese
Take all the above ingredients (except for the green pepper) and mix them together in a bowl. Spread the mixture over the pizza crust, leaving just a little in the bowl to mix your shredded chicken around in--not much is needed for the chicken, so don't worry -- lather that crust up well! Toss the chicken into the rest of the sauce and mix around. Place the chicken evenly over the pizza then take the bell pepper and slice up and sprinkle over the chicken. Now put cheese over the top and stick back in the over for about 11-13mins. Mmmmm Enjoy~


Sunday, February 6, 2011

Fresh Whole White Bread and Peanut Butter Blossom Cookies

Mmmmm smells good in my home! I am going to try and make a nice homemade bread of some sort every Sunday. I don't know why but Sunday always seems like great day to make bread. Bread is one of my BIGGEST weaknesses. I could eat it everyday, and only bread....and cheese. Yes, gotta have the cheese. Curse you Italian genes!
(I guess this makes me the bread winner in the house?)

So, even though I made this recipe the other week I never documented it.

Recipe:


(makes 2 loaves)
5 3/4- 6 1/4 Cups all purpose flour
1 package of active dry yeast (or 1 Tbs of active yeast in the jar -- this is what I do)
2 1/4 Cups of Milk
2 Tbs Sugar

1 Tbs Butter
1 1/2 Tsp Salt

1. In a large mixing bowl combine 2 1/2 Cups of flour and the active yeast; set aside.
In a medium sauce pan heat and stir milk, sugar, butter, and salt just until warm (120-130F) and butter almost melts. Add milk mixture to dry mixture and stir with wooden spoon (that's what I do) - or beat with electric mixer on high for 3 mins (scraping sides). Add as much of the remaing flour as possible and stir in with wooden spoon.
2. Turn dough out into a lightly floured surface and knead in the best you can to made a moderately stiff dough that is smooth and elastic (6-8 mins) Shape dough into a ball and place in a lightly greased pan - turning once to grease the surface of the dough. Cover; let rise in a warm place covered with a towel for about 1 hour, or until double in size. (45-60 mins).
3. Punch dough down turn dough out into a lightly floured surface, divide dough in half, cover and let rest 10 mins. Meanwhile lightly grease 8x4x2" loaf pans.
4. Shape dough into loaves pans.
5. Place the shaped dough in a warm place, covered and let rise till double in size (I always skip this and just let it rest for 10 mins then sick them in the oven)
6. Bake at 375F for 40 mins, or until bread sounds hollow. (tap the top of the bread with your fingers) I find mine are cooked in about 23 mins. Just watch your oven.
7. Remove from pans, and cool on wire rack.
8. Thank Ashley and then devour hot bread with honey, jam or butter. Mmmmm
-------------------------------------------
I made these for some special people tonight as well --YUM!!


Peanut Butter Blossoms
  • 1/2 Cup Shortening
  • 1/2 Cup Peanut Butter
  • 1/2 cup Sugar
  • 1/2 cup Brown Sugar
  • 1 tsp Baking Powder
  • 1/8 tsp Baking Soda
  • 1 Egg
  • 2 Tbl Milk
  • 1 tsp Vanilla
  • 1 and 3/4 cup Flour
  • 1/4 cup Sugar
  • Chocolate kisses/hugs
1. In a large mixing bowl beat the shortening and peanut butter with an electric mixer.
2. Add sugar, brown sugar, baking powder and baking soda. Beat until combined. Beat in egg, milk and vanilla until combined. Mix in flour.
3. Shape dough into balls, roll them in sugar and place on ungreased cookie sheet.
4. Push Chocolate into cookie
5. Bake at 350F for 10-12 mins.